Transform Your Home Decor with Diamond Paintings: A Guide to Getting Started
Diamond paintings are a sparkling new trend in home decor that can transform any space. These unique art pieces are created by applying colorful resin diamonds to a canvas, resulting in a stunning mosaic-like image. If you're new to diamond painting, this guide will help you get started and provide tips and tricks for a flawless finish. From choosing the right kit to showcasing your finished artwork, let's dive into the world of diamond paintings!
Key Takeaways
- Diamond paintings are a popular trend in home decor that can add a touch of sparkle and elegance to any space.
- When choosing a diamond painting kit, consider the design, shapes, the quality of the canvas and diamonds.
- Create a comfortable and organized workspace by gathering essential tools and setting up a dedicated area for diamond painting.
- To get started with diamond painting, unbox your kit, organize your diamonds, and apply them carefully to the canvas using the provided tools.
- Follow tips and tricks such as working with difficult areas, avoiding common mistakes, and sealing and framing your finished piece for a flawless finish.
What Are Diamond Paintings?
A Sparkling New Trend in Home Decor
Diamond paintings have quickly become a popular choice for home decor enthusiasts. With their dazzling sparkle and unique designs, they add a touch of elegance and glamour to any space. Whether you're looking to spruce up your living room or create a stunning focal point in your bedroom, diamond paintings are a fantastic way to transform your home.
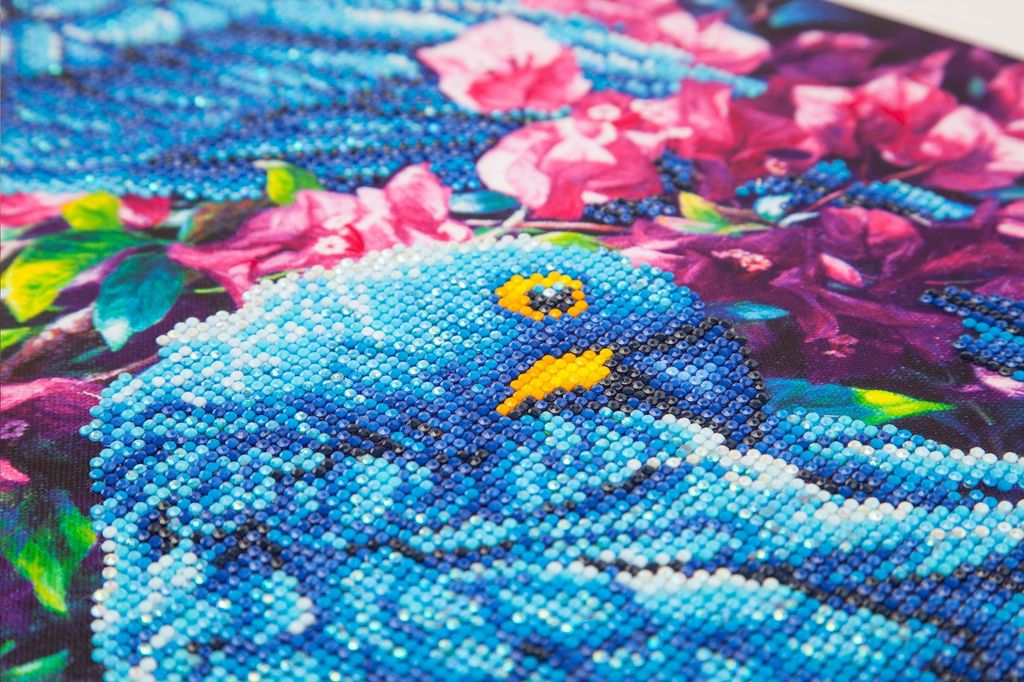
But what exactly are diamond paintings? They are a form of art that uses tiny resin diamonds to create stunning mosaic-like designs. Each diamond is placed onto a canvas, which is pre-printed with a design. As you place the diamonds, the image gradually comes to life, creating a beautiful and eye-catching piece of art.
If you're new to diamond paintings, don't worry! They are easy to get started with and require no prior artistic experience. All you need is a diamond painting kit and a little bit of patience. So why not join the trend and add some sparkle to your home decor?
How Diamond Paintings Work
Diamond paintings are a unique form of art that combines the beauty of painting with the sparkle of diamonds. Each diamond painting kit comes with a canvas that has a printed design, adhesive surface, and a set of small resin diamonds. The diamonds are color-coded and correspond to symbols on the canvas, making it easy to follow the pattern and create a stunning piece of art. To complete a diamond painting, you simply place the diamonds onto the adhesive surface, following the pattern and filling in each section. The result is a dazzling and vibrant artwork that adds a touch of elegance to any space.
Choosing the Right Diamond Painting Kit
Finding Your Perfect Design
When it comes to finding your perfect design for a diamond painting, the options are endless. You can choose from a wide range of themes, including landscapes, animals, flowers, and more. Let your imagination run wild and pick a design that speaks to you.
If you're unsure where to start, consider browsing online craft stores or websites dedicated to diamond paintings. These platforms often have a vast collection of designs to choose from. You can also check out social media groups or forums where diamond painting enthusiasts share their favorite designs and recommendations.
Once you have a few designs in mind, take into account the size of the canvas and the level of detail. A larger canvas allows for more intricate designs, while a smaller canvas may be better suited for beginners or those looking for a quicker project.
Remember, the most important thing is to choose a design that you love and enjoy working on. Happy diamond painting!
Understanding Diamond Sizes and Shapes
Diamond paintings come to life through the myriad of tiny diamonds that you meticulously place on the canvas. Each diamond, also known as a 'drill,' can vary in size and shape, influencing the overall detail and texture of your finished artwork.
Round diamonds are perfect for beginners due to their ease of placement and the satisfying speed at which you can progress. On the other hand, square diamonds fit snugly together, leaving no gaps and creating a more seamless and detailed mosaic.
Here's a quick rundown of the common sizes:
- 2.5mm (most common for round diamonds)
- 2.8mm (standard for square diamonds)
Shapes can also range from the basic round and square to special varieties like stars, hearts, or even teardrops. These special shapes are typically used to accentuate certain features of a painting and add an extra layer of dimension.
Quality of Canvas and Diamonds
When it comes to diamond paintings, the quality of the canvas and diamonds is crucial. You want to make sure you're working with materials that will result in a stunning finished piece. Remember, the canvas and diamonds are the foundation of your artwork, so it's worth investing in high-quality materials.
Preparing Your Workspace
Gathering the Essential Tools
Before you dive into the world of diamond painting, it's important to gather all the essential tools you'll need. Here's a quick checklist to make sure you're prepared:
- Diamond Painting Kit: Make sure you have a complete kit that includes the canvas, diamonds, applicator tool, and wax.
- Tray or Container: Use containers to organize your diamonds by symbols or numbers. This will make it easier to find the right diamond when you're working on your painting.
- Tweezers: Tweezers can be helpful for picking up square drills.
- Light Pad: A light pad can make it easier to see the symbols on the canvas, especially if you're working in a dimly lit area.
Remember, having the right tools can make your diamond painting experience more enjoyable and efficient. So take the time to gather everything you need before you start!
Setting Up a Comfortable Work Area
When it comes to diamond painting, having a comfortable work area is essential. Here are a few tips to help you set up a cozy space where you can unleash your creativity:
- Choose a well-lit area: Make sure you have enough light to see the tiny diamonds. Natural light is ideal, but if that's not possible, invest in a good desk lamp.
- Invest in a comfortable chair: Since diamond painting can take hours to complete, it's important to have a chair that provides proper support and cushioning. You don't want to end up with a sore back or neck!
- Organize your supplies: Keep all your diamond painting tools and materials within reach. Use storage containers or a dedicated organizer to keep everything tidy.
Creating a comfortable work area will not only enhance your diamond painting experience but also make it easier to stay focused and enjoy the process.
Getting Started with Diamond Painting
Unboxing Your Kit
Once you receive your diamond painting kit, it's time to unbox and get started on your creative journey. Excitement fills the air as you open the package and discover all the treasures inside. Here are a few things to keep in mind as you unbox your kit:
- Carefully remove the packaging.
- Lay out all the items, such as the canvas, diamonds, and tool kit.
- Take a moment to admire the design and envision how it will come to life with the sparkling diamonds.
Unboxing your kit is like opening a box of possibilities. It's the first step towards creating a beautiful diamond painting masterpiece.
Organizing Your Diamonds
Once you have unboxed your diamond painting kit and gathered all the necessary tools, it's time to organize your diamonds. This step is crucial to ensure a smooth and enjoyable diamond painting experience. There a two different kinds of packaging for the drills: sealed packaging and self-closing bags (zipped bags). Here are some tips to help you get started:
Sealed packaging:
- Use diamond storage containers or small compartments to keep your diamonds separated and easily accessible.
- Label each compartment or container with the corresponding symbols or numbers to avoid confusion.
Self-closing bags:
- Utilize zip-lock bags independently, containers are not necessary all the time and are not a must-have.
Remember, a well-organized workspace will save you time and frustration, allowing you to focus on the creative process.
Applying the Diamonds to the Canvas
Now comes the fun part - applying the diamonds to the canvas! This is where your masterpiece starts to take shape. Gently press each diamond onto the corresponding symbol on the canvas. Make sure to double-check that you're placing the right color in the right spot. It's like a puzzle, but with a sparkling twist!
To make the process easier, you can use a diamond painting pen or tweezers to pick up and place the diamonds. Tweezers are suitable for use with square drills, but their effectiveness may be limited when working with round drills. All kits come with a wax pad that is inserted into the drill pen to help the diamonds stick to the pen. Tweezers are not always included.
Pro tip: You can start from the top of the canvas and work your way down or vice versa. This will prevent dirt and other debris from accidentally sticking to the canvas.
Once you've placed all the diamonds, take a step back and admire your work. It's amazing how those tiny gems can transform a blank canvas into a dazzling piece of art!
Tips and Tricks for a Flawless Finish
Working with Difficult Areas
Working on a diamond painting can be a fun and relaxing activity, but sometimes you may come across areas that are more challenging to work on. Whether it's a small section with intricate details or a large area with multiple colors, here are some tips to help you tackle those difficult areas:
- Take your time: Difficult areas require patience and precision. Don't rush through them, take your time to ensure each diamond is placed correctly.
- Use tweezers: Tweezers can be a handy tool when working with square diamonds or in tight spaces. They give you more control and make it easier to place the diamonds accurately.
- Double-check the color codes: When you're dealing with multiple colors, it's important to double-check the color codes on the canvas and the diamond packets. This will help you avoid any mistakes and ensure the right color is placed in the right area.
Remember, working on difficult areas can be challenging, but with the right techniques and tools, you can achieve a flawless finish.
Avoiding Common Mistakes
When it comes to diamond painting, there are a few common mistakes that beginners often make. But don't worry, we've got you covered with some tips to help you avoid these pitfalls and create a flawless masterpiece.
One of the most common mistakes is not organizing your diamonds properly. It can be overwhelming to have hundreds or even thousands of tiny gems to work with, but taking the time to sort them by color and size will make the process much smoother.
Another mistake to avoid is rushing through the painting. Diamond painting is a relaxing and therapeutic activity, so take your time and enjoy the process. Trying to finish quickly can lead to misplaced diamonds and a less polished final result.
Lastly, make sure to seal and frame your finished piece. This will not only protect your artwork but also give it a professional and finished look. There are various sealants available specifically for diamond paintings, so be sure to choose one that is compatible with the materials you use.
Remember, diamond painting is all about creativity and relaxation. By avoiding these common mistakes, you'll be well on your way to creating a stunning piece of art.
Sealing and Framing Your Finished Piece
Once you have completed your diamond painting masterpiece, it's time to seal and frame it to preserve its beauty and protect it from dust and damage. Sealing your finished piece not only adds a glossy finish but also ensures that the diamonds stay in place. There are several options for sealing your diamond painting, including using a clear adhesive spray or applying a layer of clear drying glue. Choose the method that works best for you and follow these simple steps:
- Lay your finished diamond painting on a clean and flat surface.
- If using a Protective Sealer, hold the can about 12 inches away from the painting and spray a thin, even layer over the entire surface. If using a paste-like liquid, apply a thin layer using a brush or sponge.
- Allow the Protective Sealer to dry completely before moving on to the framing step.
Pro tip: Before sealing your diamond painting, make sure to remove any dust or debris from the surface using a soft brush or cloth.
Remember, the sealing process is crucial for preserving the longevity of your diamond painting. Take your time and follow the instructions carefully to ensure a flawless finish.
Exploring Advanced Techniques
Enthusiasts often encounter two distinct types od Diamond Painting: full coverage and partial. Full coverage diamond paintings typically employ standard-shaped diamonds — either round or square — to cover the entire canvas. Special-shaped diamonds were not commonly used in full coverage designs. However, recent developments have introduced two unique standard drills: AB's, Fairy Dust drills, and Glow In The Dark. These special drills add an extra layer of brilliance to the canvas, enhancing the overall visual impact.
On the other hand, partial diamond paintings deviate from the top-to-bottom coverage seen in their full coverage counterparts. Instead, the background remains plain white, devoid of adhesive, while only the designated image area features glue. To complete these canvases, special-shaped rhinestones are utilized, offering a distinctive and creative touch to the final masterpiece.
Using Special Diamond Shapes
Special diamond shapes add an extra touch of uniqueness to a partial diamond painting. These shapes come in a variety of options, including stars, hearts, flowers, and more. By incorporating special diamond shapes into your design, you can create eye-catching patterns and enhance the overall visual appeal of your artwork.
Showcasing Your Diamond Painting
Choosing the Right Frame
When it comes to choosing the right frame for your diamond painting, there are a few things to consider. First, think about the style and theme of your artwork. Do you want a sleek and modern frame or a more ornate and traditional one? Bold frames can add a pop of color or contrast to your piece, while subtle frames can enhance the overall elegance.
Next, consider the size of your diamond painting. You'll want to choose a frame that complements the dimensions of your artwork. A frame that is too small can make your painting feel cramped, while a frame that is too large may overpower the details.
If you're unsure about which frame to choose, here are a few options to consider:
- Black Gallery Frame: This classic frame adds a touch of sophistication and works well with a variety of artwork styles.
- Wooden Floater Frame: This frame creates a floating effect, giving your diamond painting a modern and unique look.
- Metallic Frame: If you want to add some shine and glamour to your artwork, a metallic frame can do the trick.
Remember, the frame you choose should complement your diamond painting and enhance its beauty. So take your time, explore different options, and find the perfect frame that brings out the best in your artwork.
Displaying Your Artwork
Once you've completed your dazzling diamond painting masterpiece, it's time to show it off! Here are some fun and creative ways to display your artwork:
- Frame it: Give your diamond painting a polished look by framing it in a beautiful frame. Choose a frame that complements the colors and style of your artwork.
- Create a gallery wall: If you have multiple diamond paintings, create a gallery wall to showcase your collection. Mix and match different sizes and designs for an eye-catching display.
- Use an easel: Place your diamond painting on an easel to create a focal point in any room. This is a great option if you want to easily switch out your artwork.
- Make it a centerpiece: Turn your diamond painting into a unique centerpiece by placing it on a decorative stand or tray. Add some candles or flowers around it for an extra touch of elegance.
- Gift it: Share the joy of diamond painting by gifting your artwork to friends or family. It's a thoughtful and personalized gift that they'll cherish.
Remember, the possibilities are endless when it comes to displaying your diamond painting. Get creative and have fun with it!
Sharing Your Creations Online
Once you've completed your dazzling diamond painting masterpiece, it's time to show it off to the world! Sharing your creations online is a great way to connect with other diamond painting enthusiasts and gain inspiration for your next project.
Here are a few ways you can share your artwork:
- Social Media: Post a photo of your finished piece on Instagram, Facebook, or Pinterest. Use hashtags like #diamondpainting and #DIYart to reach a wider audience.
- Online Communities: Join online forums or groups dedicated to diamond painting. Share your work and engage in discussions with fellow artists.
- Personal Blog: Start a blog where you can showcase your diamond paintings and share your experiences. Write about your process, tips, and tricks, and connect with a community of like-minded individuals.
Remember, sharing your creations online not only allows you to showcase your talent but also inspires others to explore the world of diamond painting. So go ahead, share your sparkle with the world!
In Conclusion
Diamond paintings are a fantastic way to add a touch of sparkle and creativity to your home decor. Whether you're a beginner or an experienced artist, there's a diamond painting kit out there for you. With their vibrant colors and stunning designs, diamond paintings can transform any room into a work of art. So why wait? Unleash your creativity and start your diamond painting journey today!
Frequently Asked Questions
How long does it take to complete a diamond painting?
The time it takes to complete a diamond painting depends on the size and complexity of the design. Smaller and simpler designs can be completed in a few hours, while larger and more intricate designs may take several days, weeks, or even months.
What is the difference between round and square diamonds?
Round diamonds have a circular shape, while square diamonds have a square shape. The choice between round and square diamonds is purely based on personal preference. Some people prefer the uniform look of square diamonds, while others prefer the softer look of round diamonds.
Can I create my own diamond painting design?
Yes, you can create your own diamond painting design. There are various online tools and software available that allow you to convert your own images or photos into diamond painting patterns.
How do I store my diamond painting in progress?
To store your diamond painting in progress, you can use a large flat surface such as a foam board or a dedicated diamond painting storage folder. Place a protective cover over the painting to prevent dust and debris from sticking to the adhesive. You can also roll up the painting with the adhesive side facing outward and secure it with elastic bands.
Can I frame my completed diamond painting?
Yes, you can frame your completed diamond painting to display it as a piece of artwork. Choose a frame that complements the design and size of your painting. Make sure to use a frame with a deep enough depth to accommodate the thickness of the canvas and diamonds.
How do I seal my finished diamond painting?
To seal your finished diamond painting and protect it from dust, moisture, and fading, you can apply a layer of diamond painting sealant or clear varnish. Use a soft brush or roller to evenly coat the entire surface of the painting. Allow the sealant to dry completely before handling or framing the painting.