Stamped Cross-Stitch Going Home Full Coverage 11ct 14ct Cotton & Silk Threads Charlie's Official Store
Diamond Painting  A Moment In Time Round & Square Full Coverage (Copy) Charlie's Official Store

Diamond Painting Going Home Full Drill Round & Square Full Coverage

Regular price$36.94
/
Shipping calculated at checkout.

Size
Style
  • Free US & Canada shipping on orders over $49
  • In stock, ready to ship
  • Inventory on the way
Diamond Painting Going Home Full Drill Adults Arts & Crafts Mosaic Embroidery Kits 
Diamond Painting Kits Full Drill DIY Wall Picture Mosaic Craft Gift Home Decor
Feature:
Diamond paintings use sequins, which we call diamond drills - because they are cut as a diamond - the sequins or drills, have dazzling, unique luster, and brilliant light that sparkles. This is the most popular DIY hobby or pass-time at present.
Colorful diamond paintings will decorate your living room, bedroom, bathroom, or any other part of your home to match and create different styles.  We are sure that you will like it.
Specification:
Material: Short Lint Canvas - scalloped 
Project type: Full drill diamond painting
Diamond type: Round & Square Diamond
Diamond Packaging: Hand-made Standardized diamond packaging
Approximate sizes:
Design Area: 40*40cm / 50x50cm / 60*60cm / 70*70cm
Space: living room/bedroom/classroom/entrance
DIY diamond painting steps:
1. Open the box, and check whether the kits are complete;
2. According to the color code, choose a color and pour it onto the plate; If you paste the same color at the same time, you can increase the speed;
3. Find the symbols in the picture, and paste them until finished;
4. When the painting is finished, put some books on top for a while, it will settle the drills more firmly into the glue;
5. Congratulations, you can go and frame it to decorate your home
Tips:
Frame not included! 
This diamond painting still needs to be finished, you need to do it yourself (DIY).
Note:
1. Due to the different monitor and light effects, the actual color of the item might be slightly different from the color shown in the pictures.
2. Due to manual measurement, Please allow a 1-2cm measuring deviation.
Package Content:
1 X Soft back canvas 
1 X Inventory Sticker Sheet 
1 X Diamond Painting drills – Various color-coded diamond drills - 30% extra
1 Set X Diamond Painting Tools

This site is protected by reCAPTCHA and the Google Privacy Policy and Terms of Service apply.

Customer Reviews

Be the first to write a review
0%
(0)
0%
(0)
0%
(0)
0%
(0)
0%
(0)

Top quality products

A family company

60-Days Return Policy

Licensed Products

CROSS STITCHING STEPS

STEP 1: Prepare Your Fabric

Secure the fabric in an embroidery hoop or frame, ensuring it's taut and wrinkle-free.

STEP 2: Thread Your Needle

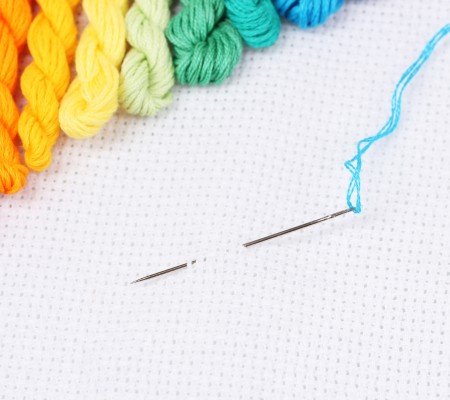
Separate the strands of embroidery floss according to your pattern's instructions. For most patterns, you'll use two strands of floss.

STEP 3: Execute the Stitches

Finish each strand of floss neatly on the backside of the fabric, securing it with a small knot or by weaving it under existing stitches.

Your Quick Starter Guide

Cross Stitching for Beginners: What You Need to Know

You'll need basic supplies like fabric, embroidery floss, needles, and a hoop to get started. Cross stitching is a skill that anyone can learn with practice. Start with simple patterns, take your time, and enjoy the process.

FAQs

To start cross stitching, you'll need fabric, embroidery floss, a needle, and a pattern. Begin by threading your needle with one strand of embroidery floss and securing it to the fabric with a knot. Then, follow the pattern's instructions.

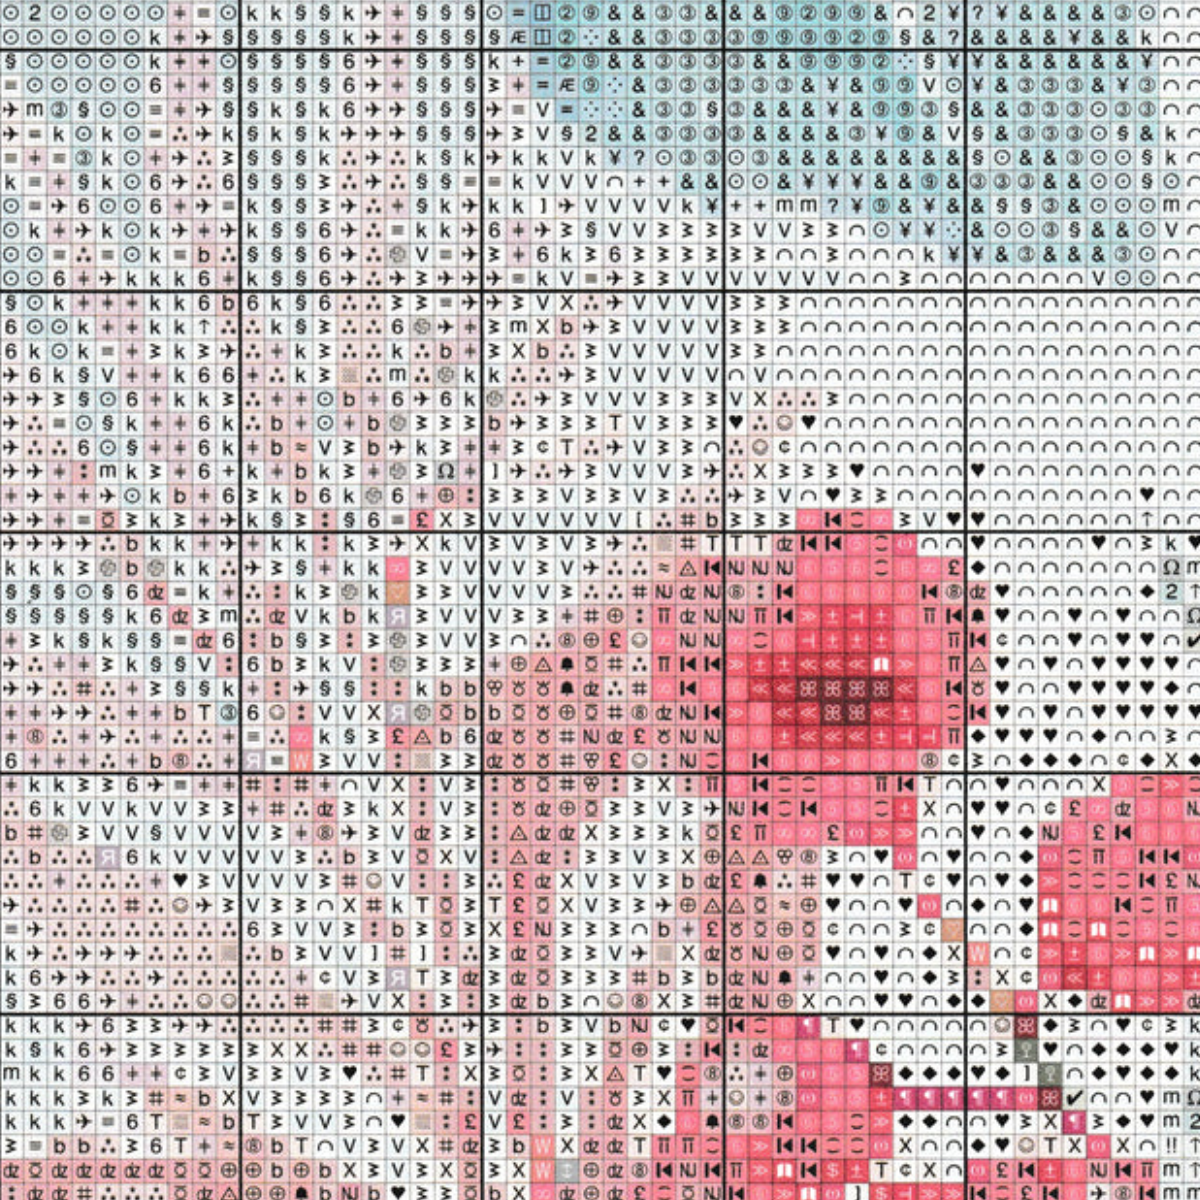
Cross stitch patterns are typically grids with symbols representing different colors of embroidery floss. Each symbol corresponds to a specific color, and you'll stitch according to the symbols on the pattern.

Once you've completed all the stitching, you can finish your project by framing it, turning it into a pillow, or sewing it onto a fabric backing. If framing, ensure the fabric is stretched smoothly and evenly within the frame. If sewing onto a backing, use a whipstitch or running stitch to secure the edges.

To wash a finished cross stitch piece, gently hand wash it in lukewarm water with mild soap, then rinse thoroughly and blot dry with a clean towel. Avoid wringing or rubbing the fabric, as this can distort the stitches. Once dry, you can iron the piece on the reverse side using a low heat setting.

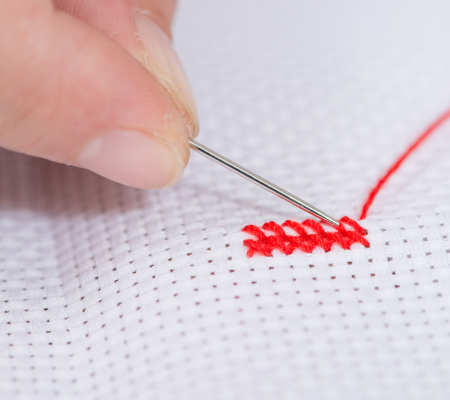
To achieve neat and even stitches, maintain consistent tension on the embroidery floss as you stitch. Ensure each stitch crosses in the same direction, either bottom-left to top-right or bottom-right to top-left, to maintain uniformity.

Mistakes in cross stitching can often be corrected by carefully removing stitches with a seam ripper or small scissors. Take care not to damage the fabric or adjacent stitches. If the mistake is minor, such as a misplaced stitch, you can sometimes leave it or cover it with a correctly placed stitch of the correct color.